Showing posts with label Crafts. Show all posts

Friday, April 8, 2011

Taggie Blanket

Pin It now!
When I was pregnant with Dawson we got a Taggie Blanket as a gift from somebody and I honestly didn't know what it was... Fast forward a few months when Dawson was about 6 or 7 months old and started finding the tags on all of his toys and sucking on them! Seriously, the tag was totally his favorite part of any toy! And then a light bulb went off, THAT is what that blanket is for! (It's not really a blanket, I don't know why I keep calling it that...) Anyway, I got it out for him and he really liked it. We even bought him a taggie book and can you guess what his favorite part of both the book and the blanket were? Yep, the actual tag. :P There's no fooling this kid, he's been a smarty pants from the very beginning. :D Here is a picture of him sucking on the tag of his taggie book.


I hope that Ashlynn likes tags as much as Dawson did because I made her a taggie blanket. :) I hope she's not disappointed that it is missing a real tag!


I am loving my new sewing machine! I have made so much progress from the first time that I sewed, my seams are so much straighter!!! I am looking forward to getting lots more practice!

Tuesday, March 29, 2011

DIY Car Seat Cover

Pin It now! I sewed! I sewed!! My wonderful husband bought me a sewing machine a couple of months ago! Yippee! It took me a while to make anything because before now I had never sewed, I always talked about all the stuff that I wanted to make but didn't really think I ever could because I didn't even know how to use a sewing machine. I'm learning now though! I'm glad that my husband knows how to work a sewing machine and could teach me what I needed to know because I didn't know how to work it at all! In one night I went from not even knowing how to turn a sewing machine on -- to making this:


It's basically a blanket with velcro straps and boy is it handy!! I always throw a blanket over Ashlynn's car seat when we go out and then I either have to hold the handle with the blanket over it (which makes me nervous because I don't feel like I have good grip on the handle) or I have to put my arm under the blanket to hold the handle and then she's not completely covered like I would like her to be. So this car seat cover is perfect for me. :) I followed a few different tutorials that I found by Googling car seat cover tutorials.

I still have some practicing to do but I am beyond happy with how this turned out.


I have a long list of things that I want to make and I'll be sure to post them here as I finish them. :)

Thursday, March 18, 2010

No Sew Fleece Mickey Mouse Blanket

Pin It now! We are going to Disneyland in 18 days! Dave and Dawson have never been before (well, Dave went to Hong Kong Disney, but he's never been to Disneyland in Anaheim, California) and we are all really excited about the trip! A few months ago when I started planning our trip I started to develop a major obsession for Mickey Mouse. I have always loved everything Disney, I buy Disney movies as soon as they come out, even if I haven't seen them before, but I wouldn't say I have ever been obsessed with Disney...until now. It's not all things Disney that I'm obsessed with, like I mentioned before it's this cute little Mouse that has me hooked! I decided that I wanted to make Dawson a Mickey Mouse blanket that he can use while we are staying in the hotel at Disneyland. (I bought him some cute Mickey Mouse pj's, too, I can't wait for him to wear them!)

Anyway, about the blanket, I have never made a blanket before so I wanted to start out with something simple. I went to Jo-Ann's and picked out the 2 pieces of fleece that I wanted. I got 4 yards total, 2 yards of Mickey and 2 yards of red.


Then I trimmed the edges that needed to be trimmed...
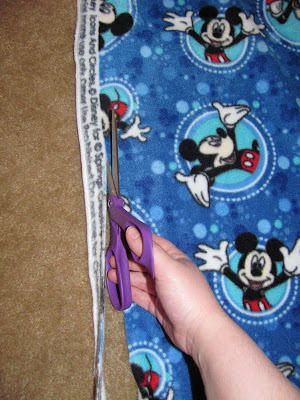

Next I laid the 2 pieces of fleece on top of each other. One side of the fleece is a little fuzzier than the other side, I made sure the fuzzier side of each piece was facing each other and then I trimmed what I needed to, to make sure they were the same size. I forgot to take a picture of this step, but I think it's simple enough.

Then I cut a piece of paper into a 5 inch square, and I used that paper as my guide to cut all 4 corners off both pieces of fleece.


Then I lined my yard stick up to use as a guide so I would know where to stop cutting. One end was lined up with one of the corners that I had just cut out...


And I used my measuring tape to make sure that I had my yard stick lined up straight on the other end of it.


Then I started cutting my strips, I tried to make them each about 1 inch wide, but I was just eyeing it, it would have taken FOREVER to measure before I cut each strip.


After they were all cut I tied each strip together. (A Mickey strip to a red strip) And I forgot to take a picture of this step, too. Oops!

Here is the finished product... the Mickey side...


And the other side...


It is so soft and comfy, I love it and Dawson thinks it's pretty neat, too.

Thursday, December 3, 2009

Monthly Craft Challenge - Christmas Edition

Pin It now!

I heard about this Monthly Craft Challenge over at Blue Eyed Blessings from my friend at Three A's and a C. At first I wasn't planning on participating, but I changed my mind! It sounds like a lot of fun and I am excited to see what everybody else comes up with!

I decided to make a candy ornament for our tree. (I actually made two just for fun) It was really easy and they turned out really cute!


What you need to make this ornament:

- 5 pack of gum (I couldn't find the 5 pack of Wrigley's gum anywhere, until after I had already made them of course. So I just used 5 individual sticks of gum and taped them together)
- red or green mints
- pack of lifesavers
- Hershey's kiss
- carmel
- ribbon
- glue

I re-wrapped my mints and carmels in saran wrap because the original wrappers had writing all over them and it was bothering me. *lol*

I'm looking forward to making this ornament again when Dawson is older and he can make one too. I think it would be a fun project to do after reading him The Polar Express and while we sip on hot chocolate. (Speaking of The Polar Express, the movie is going to be on ABC Family tonight! I am so excited because I have never seen it before...crazy, I know!)

Also, I posted about another Christmas decoration that I made with my son's handprints earlier in the week. I love how it turned out and I am pretty proud of it so I'll post a picture of it here too! :-)


Check out Blue Eyed Blessings to see what others have made this month!

Wednesday, October 7, 2009

Party Invitation

Pin It now! Dawson's first birthday is in less than 3 weeks! I have been planning his party for awhile now and I am excited that it's finally almost here!

I just finished up the last of the invitations and they are all ready to be sent out! I wrote the poem that I wanted to use on the invitations a couple months ago and then I made a rough draft of the invitation about a month ago. It's taken me awhile to finally get them finished, but I did it!


Dawson LOVES dogs so we chose a puppy theme for his birthday. The invitation says:

Please join us for some TAIL-WAGGIN' fun
Dawson Nicholas is turning ONE!
A light lunch, cake and ice cream too
The party won't be complete if we're missing you!
So wipe your PAWS and COME! SIT! STAY!
It's going to be a DOGGONE great day!

I'm really happy with how they turned out. Simple but cute. :-)

Thursday, October 1, 2009

My First Halloween Project

Pin It now! A few days ago my wonderful husband sent me a bouquet of fruit:


The fruit was so yummy and the ceramic pumpkin that it came in was too cute! I originally had planned to make some sort of fall colored flower arrangement to put in the pumpkin and use it as a center piece on my kitchen table. But with Halloween coming up and it being one of my favorite holidays, I decided to try and create a spooky halloween tree!

This is how it turned out:


Spooky!

I bought spray paint so I could paint the styrofoam, branches and leaves black, but it's too windy outside to spray paint anything! I am really impatient and wanted to see what it would look like once I bought everything, so I had to put it together today with or without the black spray paint. :-)

I can easily take it apart and put it back together, so if it's not windy out tomorrow I will spray paint it then.

Here is a closer picture:

And a little closer:


There are spiders, bats and hanging skeletons. I am so excited that it's finally October! The last 3 months of the year are always my favorite.